I’ve decided to write a tutorial that combines some key elements of working with InfoPath 2007 and SharePoint 2007. In this guide, I’ll be creating a quiz that can be completed online. The questions and results will be stored in SharePoint. InfoPath will provide the presentation layer for the application. It will also calculate the results and provide feedback to the quiz taker.
To follow along you’ll need a (virtual) computer running the following:
- InfoPath 2007
- SharePoint 2007(Enterprise license required for web enabled forms)
Okay, here we go:
Creating the Data Layer
List 1: Super Mega Quiz
- In SharePoint, browse to your target site and create a custom list called Super Mega Quiz. This list will be display the questions and allow respondents to provide their answer.
- Rename the Title column to Question.
- Create the following single line of text columns: Answer, Correct Answer, Result. For the Result annd Answer fields, enter a single space (with your spacebar) character in the Default Value property. If you don’t enter something in each field of a list item, you can’t edit that field later in InfoPath (InfoPath quirk, or by design?).
- Create the following number column: Weighting
- Add three rows of data for our testing:
- Row 1:
- Question: What colour is the sky?
- Weighting: 1
- Correct Answer: Blue
- Row 2:
- Question: 3 + 7
- Weighting: 5
- Correct Answer: 10 ten
- Row 3:
- Question: How many legs does a spider have?
- Weighting: 3
- Correct Answer: 8 eight
- Row 1:
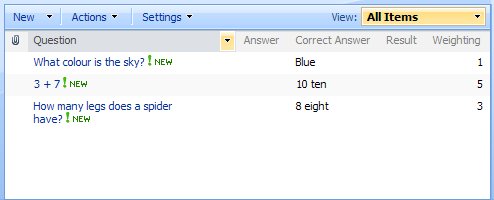
Notice that we don’t need to complete all the fields. The other fields will be completed by the respondents or calculated by InfoPath. Your list should look something list this:
List 2: Quiz Administration
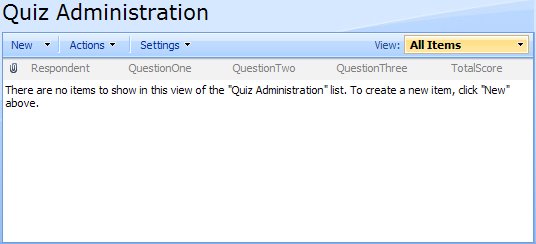
- Create another list called Quiz Administration. This list will store the results from the submitted quizes.
- Rename the Title column to Respondent.
- Create the following sinbe line of text columns: QuestionOne, QuestionTwo, QuestionThree, TotalScore. When working with SharePoint lists (I find) that it’s always best practise to avoid spaces in column names. You can always go back and rename the columns after you’ve created them to add the space. The internal name, though, will remain unchanged and be easier to reference. I’ve also found that the SharePoint Search service has problems indexing the contents of columns with spaces in their internal name.
You list should now look like this:
Create the Presentation Layer
We’re going to use InfoPath 2007 to display the questions. InfoPath Data Connections provide a simple method for connection InfoPath fields a SharePoint list. We’ll link the data to a repeating table and display the questons to the respondents. This can be achieved with just a fee mouse clicks. The end result is an active data connection that grabs data from SharePoint every time the InfoPath form is opened; change the data in the list and the changes are reflected the next time the form is opened.
Setup the Form
- Open InfoPath 2007.
- On the Getting Started Screen, select Design a Form Template…
- Select the Blank Template. If you’re developing a browser-enabled form, check Enable browser-compatible features only and click OK.
- Set the Font to Verdana, 18-point and give the form a title: Super Mega Quiz.
Create the Receive Data Connection
- From the Tools menu, select Data Connections.
- Click the Add button and select Create a new connection to: Receive data. Click Next.
- Choose SharePoint library of list as the data source and click Next.
- The next screen needs the path to your SharePoint site and click Next.
This is the parent site that you created a list in. If you’re not sure what to put in here, just browse to one of the lists you created earlier. Have a look at your browser’s address bar. It should say something like:
http://SharePointServer/Lists/Quiz%20Administration/AllItems.aspx
Grab everything before Lists. In the previous example, you’d use the following:
http://SharePointServer/ - The next screen list all the Lists and Libraries in the site. Select Super Mega Quiz and click Next.
- We now have to select the columns we’d like to be returned to InfoPath. We’ll take the Question, Answer, Correct_Answer, Result, Weighting & ID fields. Click Next.
- At this screen you can choose if you’d like to store a copy of the results in the form template. This is mostly useful for people wishing to take a form home and complete it offline. Click Next.
- Select Automatically retrieve data when form is opened and click Finish. Close the Data Connections screen to return to the form.
Create the Table of Questions
- From the View Menu, select Design Tasks. This will show the Design Tasks pane to the right of screen. We will be working in this area quite a bit. It’s kind of like the form’s control centre.
- In the Design Tasks pane, select Data Source.
- Initially we’re presented with the Main data source. This data source holds all the fields and elements that are manually created in the form. We’ll be creating a field here later.
- For now, click on the Data Source drop-down and select Super Mega Quiz (Secondary).
- Directly below the drop-down is our data schema, represented graphically as a tree-view control. If you expand the myFields node, dataFields node and the Super_Mega_Quiz node, you’ll see all the data elements that we retrieved from our SharePoint list.
- Click on the Super_Mega_Quiz node and drag it to the form.When you release the mouse button, you’ll get a context menu from which you can select Repeating Table.
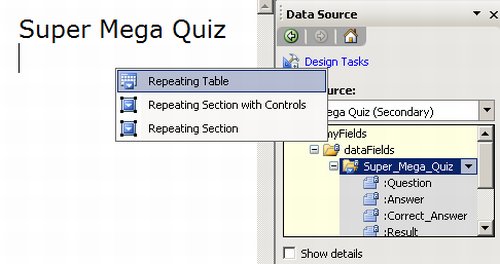
- This will paste your data source as a nicely formatted table.
- You’ll notice that the ID field is the last field. I’m going to use the ID field to number the questions. In practise, it’s always a bad idea to use a database table’s unique identifier as an ordinal. One reason for this is that if I was to delete the third question andcreate a new question, it’s ID wouldn’t be three anymore; its ID would be four. I want the ID field to be the first field in the table. If you want to follow along, use the Table menu to add a column to the front of the table. Then drag the ID field’s textbox to the new column. I named the new column Number and deleted the original ID column.
- You can also delete the Correct Answer column as we don’t want the respondent’s seeing the correct answer. Click anywhere in the column and use the Table menu to select Delete Columns. It’s interesting to note how InfoPath uses fields (textboxes). These fields are bound to a data source. It doesn’t matter where you move them to on the form, they still keep their binding. The only way to change their binding is to right-click on the field and select Change Binding. You can even delete the field and just drag it back again from the Data Sources pane.
- Your Quiz table should now look something like this:

- Feel free to Preview your form at this stage. If you receieve a data connection warning, press Yes. Don’t worry about formatting any of the fields. We’ll get to that later.
Score Quiz and Calculate Score
- Now we’re going to add a couple of elements to the form. We’re going to add a textbox that will display the respondent’s total score. We’ll also add button that will control submitting the form.
- On the form, move the mouse cursor past the repeating table, and add a couple of line breaks.
- From the Table menu, select Insert Layout Table. Create a layout table with one row and two columns. I use layout tables extensively when building InfoPath forms. It really helps align items correctly.
- On the Design Tasks pane, ensure you’re viewing the Data Source pane and select the Data Source drop-down. Change to the Main.
- Right-click on myFields and select Add.
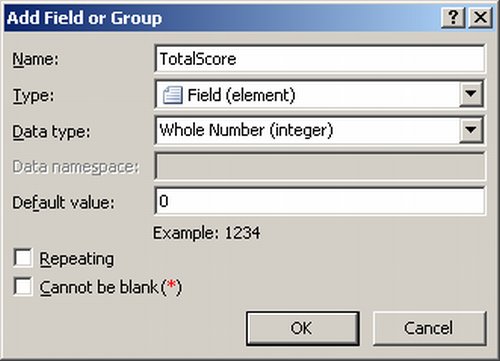
- Enter the following information an click OK (example shown below)
- Click on the newly created TotalScore node in the Data Source treeview and drag it to the right-hand column of the layout table.
- On the DataSource pane, click on the Design Tasks link (near the top). This will take you back to the Design Tasks homepage. Select Controls to bring up the Controls pane.
- In the Controls pane, under the Standard section is the Button control. Drag this control to the left-hand column of the layout table.
- Click on the button and use the guides to resize the button and righ-align it in the column.
- Double-click on the button to bring up its properties. Change the label to Sumit Quiz. Change the ID to btnSubmit.
- Click OK to return back to the form.
Fine-tune Form
- Before going any further we must make some configuration changes to our form. I’m going to assume the we’re creating a web compatible form. I’ll let you know if there’s any changes that aren’t relevant to offline forms.
- Before going any further, save your form to a location of your choice. you might get a message about publishing fields. We’ll get to that later.
- From the Tools menu, select Form Options.
- Select the Security and Trust category. Turn off Automaticallydetermine security level and select Full Trust (these settings are beyond the scope of this tutorial and I’m just picking the least restrictive setting for the case of simplicity).
- Select the Programming category and change the programming language from Visual Basic to C#. If you’d like to keep your code in a different location, change this now (it’s a pain to change it later).
- Click OK.
Business Layer
Write Code to Mark the Quiz
- The quiz will be marked when the respondent clicks on the Submit Quiz button.
- Double-click on the button and click the Edit Form Code button. This will start the VSTA code editor so that we can add some behaviours to the button.
- The code editor will automatically create a btnSubmit_Clicked() method for you and wire up the event. Any code we place in this method will be executed when the button is pressed.
- Since we’re going to be doing a few things with this button, we’ll create separate methods and call them from within the btnSubmit_Clicked() method.
- Inside the method, enter a call to a MarkQuiz method. We’ll write this method next. Your code should look like this:

- Now we’re going to write the MarkQuiz() method. Here’s what it looks like. I’ll explain it as clearly as possible:
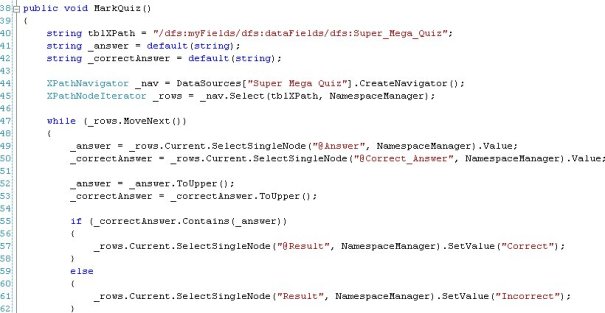
- Line 40: This is the XPath descriptor that points to te Super_Mega_Quiz data source (our table). See, everything in InfoPath is stored as an XML document, which is a type of document that describes (and can store) data as a series of nested fields. In this statement the Super_Mega_Quiz element is stored within the dataFields element, which in turn is stored within the myFields element. Basically this line explains where our table resides and is used later in the code. I declare it up here, so I can keep line 45 clean later on.
- Lines 41 & 42: I have declared two variable (placeholders in memory). They will store the values in the Answer and Correct answer fields of a row in the table.
- Lines 44 & 45: As described above, our data is stored in XML format. We need an easy way to ‘walk through’ this data and extract the values we need. By crating an XPathNavigator, then andXpathIterator, we’re able to step (or iterate) through each row of our table. On line 45 we use the string declared in line 40 to tell the iterator we want to step through all the Super_Mega_Quiz elements (a row) and its immediate child nodes (the columns).
- Line 47: The XPathIterator object provides a MoveNext() object which will return an element (row) or null if no more elements (rows) exist. We loop until there’s no rows left.
- Line 49 & 50: We’ll assign the values in the Answer and Correct_Answer columns to the variables created in lines 41 & 42. This makes it easier to work wth. Notice that one of the SelectSingleNode() parameters is he column name? The column name must always be prefixed with an @. This is just InfoPath’s convention and you can confirm the values by hovering over the field in the form (in Design view, not when you’re previewing it).
- Lines 52 & 53: Here we convert both the respondent’s answer and the correct answer to upper case, before we compare them. We don’t want someone getting the question wrong because they typed the wrong case.
- Line 55: Check if the correct answer string contains the respondent’s answer. Remember, right at the beginning, when we created the question list, we put some of the answers in as both numerals and text. This will ensure people get the question right regardless of whether they respond with a numeral of text. It also means that you can enter multiple possible correct answers for each question.
- Lines 57 & 61: If the comparison in line 55 shows the answer was correct, go to line 57 and place “Correct” in the Result column, otherwise go to line 61 and place “Incorrect” in the Result column.
- Easy!
Write Code to Calculate the Total Score
- Most exams I’ve sat have different weightings for each question. Once the test has been marked,we’ll want to sum the weightings of the correctly answered questions and provide the respondent a total score.
- Still in the VSTA code editor, let’s add another method call within the btnSubmit_Clicked() method. We’ll add it after the MarkQuiz() method and call it CalculateTotalScore(). Yes, we could have included this functionality in the MarkQuiz() question, but I want to keep the code as clean as possible, so that it’s easy for novices to follow. Add the new method call and your code will look like this:

- Next, we’ll write the CalculateTotalScore() method. Again, I’ll explain any new concepts. If it’s not explained here, it was explained in the code above (this post is getting pretty long already).
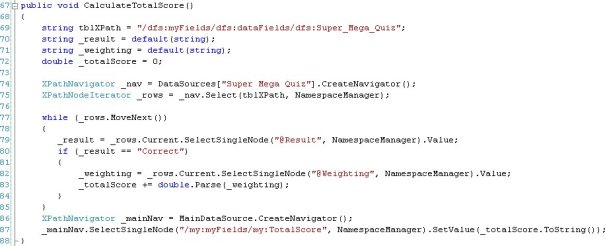
- Lines 70 & 71: Create a variable to store the result and weighting values from a row in the table.
- Line 72: Create a variable to store a cumulative score as we iterate through the table rows.
- Lines 77 & 85: Iterate through each row in the table and check the result field. If it was marked as “Correct”, grab the weighting value (line 82), then change its value to a double and add it to the current weighting value (line 83). A double is a variable that can store decimal numbers. In this way we could assigned decimal weightings to a quiz (e.g. 3.5).
- Lines 86 & 87: Convert _totalScore back into a string and write that string back to the TotalScore field on the form.
- Go ahead and preview your form if you’d like. Fill in the test and check your score.
Write code to post the Results back to a SharePoint list
- We’re going to submit the results entirely by code. Part of this process could be automated by creating a data connection to submit via a web service, but I think this method gives us better control and a greater appreciation for what’s actually going on under the hood.
- In the VSTA code editor, we’re going to add a third and final method to the CalculateTotalScore() method. We’ll call this method SubmitForm(). After you’ve added this code, the method will look like this:

- Next, we’ll write the SubmitForm() method. First, we need to add a Web Reference to the Lists web service provided by SharePoint:
- In the VSTA editor, right click on References in the Project Explorer pane and select Add Web Reference.
- In the URL field, enter the following (substituting your site’s name):
- http://<SITE NAME>/_vti_bin/lists.asmx
- The main window pane will show the methods available in the Lists services.
- In the Web reference name textbox, enter ListWebRef and click Add reference.
- We also need to add a couple of using statements to make use of our web reference and one other .Net library.
- At the top of the page of code, add the following using statements:
- using System.Collections.Generic;
- using Quiz.ListWebRef;
- At the top of the page of code, add the following using statements:
- Here’s the code for the SubmitForm() method.
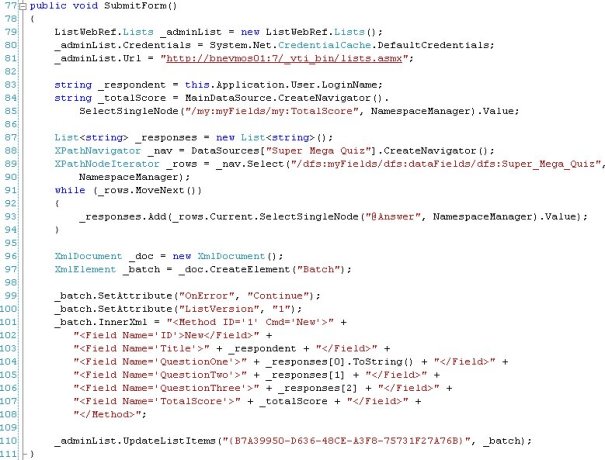
- And here’s the explanation:
- Line 79: Here we create a Lists object, made available to us by the web reference.
- Line 80: The List object will use the credentials of the person logged in to submit the list item (i.e. the quiz results).
- Line 81: The Lists object will submit usng the lists web service of our site (change the string to reference your site’s name).
- Line 83: We create a variable to hold to the value that will be posted to the respondent field. In this case, we’ll us the login name of the person currently running InfoPath.
- Line 84: Grab the value of the TotalScore field and place this in a variable for later use (this process is explained earlier. I’m using a shorthand method here to achieve the same result in one line).
- Line 87: Create a generic list of strings to hold our responses from the form.
- Lines 88 & 89: Create an XPathNavigator linked to the Quiz data source and then an XPathIterator to allow us to iterate through the data (or rows) in the table.
- Lines 91 – 94: Loop through the table rows, adding the Answer field to the collection created in line 87.
- Lines 96 & 97: Since we’re working with web services, we need to send our data in a serialized format. So, we use XML as our schema. We create an XML document and within this document we create an element which will include our data.
- Lines 99 & 100: A couple of attributes that must be set for the web service to execute correctly.
- Lines101 – 108: The actual XML data is added to the batch element created in line 97. In the Method tag, we pass an ID of 1. SharePoint will automatically provide the correct ID number when t creates the list item. The New Command (Cmd) tells SharePoint that we’re adding a new list item; not updating or deleting an existing list item. In the rest of the lines we pass data to the appropriate fields.
- Line 110: Call th UpdateListItems() method to send our list item to SharePoint. The first paramter is the target list’s GUID. Your GUID will be different from mine. To find your list’s GUID:
- Browse to the Quiz Administration list.
- From its settings drop-down menu, select List Settings.
- Look at the URL in your browser and grab all the text after List=. This is the list’s GUID.
- To format the GUID for the UpdateListItems() method, substitute the following characters: %7B becomes {, %2D becomes -, %7D becomes }.
- All Done!!
Extras
- Our current form could do with a bit of a tidy-up. A respodent can currently edit all the text fields. Double-click on each field (except Answer) and set it to read-only.
- If someone leaves an Answer empty (or with the default single space) the question is marked as CORRECT. Double-click on the Submit Quiz button and add a rule, to set the Answer textbox’s value to UNANSWERED if the value is empty or a single space.
- If you’re running MOSS Enterprise Edition, you can publish your form so that people can fill it out online.
References
I keep bookmarks of all the cool articles I find. Here’s the articles that I probably used to learn the techniques shown in this article:
- http://royaline.wordpress.com/2008/01/03/how-to-add-a-new-list-item-to-sharepoint-using-the-list-item-web-service/
- http://sharepointdata.blogspot.com/2008/12/addupdatedelete-list-item-using.html
- http://www.bizsupportonline.net/infopath2007/how-to-submit-items-rows-repeating-table-infopath-sharepoint-list.htm
- http://www.bizsupportonline.net/infopath2007/copy-rows-from-sharepoint-list-to-main-data-source.htm
I wrote this tutorial after answering a similar question on MSDN. The original post is here: http://social.msdn.microsoft.com/Forums/en-US/sharepointinfopath/thread/5033c682-6cc5-4716-88d9-ff48c96f611c
The form and code created in this article can be downloaded from my Live SkyDrive: http://cid-ba333a1e7a3f182a.skydrive.live.com/browse.aspx/.Public/SharePoint%20Gear

I am still working with office 2003. I was wondering if you could maybe save that infopath file as 2003 version?
ekenneda,
I wasn’t sure if I would be able to save it as an InfoPath 2003 form, but I gave it a try. My suspicions were confirmed.
The object model changed between InfoPath 2003 and 2007. Also, 2003 doesn’t have the ability to work with SharePoint data sources.
So, if I was to save the form as 2003, all you’d get is a repeating table and a button. Nothing would actually work. If you’re going to be working with InfoPath and SharePoint, I suggest upgrading to 2007.
Sorry,
Fodi